ErgoCub Battery Pack
Introduction
This documentation page describes the new ergoCub Battery Pack. Thereby, you will find here information on its features and how to use it.
The adopted solution is designed to power and supply the ergocub. This project is also strictly related to the use of the BMS specifically designed for this Battery Pack. From the user perspective, consider the Battery Pack and the BMS board as a single device designed for ergocub.
General description
-
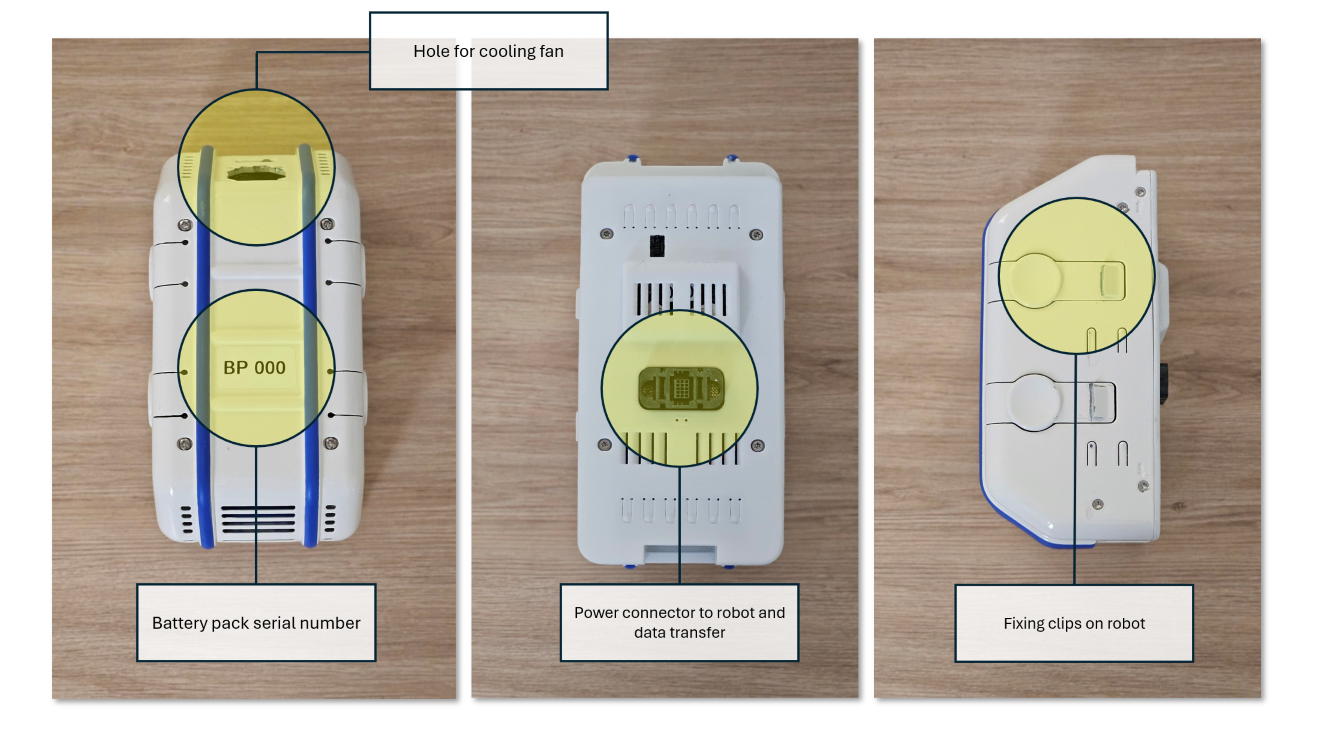
The main characteristics of the battery pack are detailed in this table:
Description weight 1.5 Kg certifications UN 38.3 nominal voltage 37 VDC capacity 8000 mAh temperature range of use -20°C min/60°C Max cell architecture 10S 2P cell technology Li-Ion 3,7V NCM, 21700
The Battery Pack is designed for use with the BMS_IIT1A-11S-50APK_PCA. Therefore, do not separate the board from the Battery Pack as it guarantees that the Battery Pack operates safely and under control during charging and discharging. Controls are implemented for:
- Overvoltage
- Undervoltage
- Overcurrent
- Under-temperature
- Overtemperature
- Cell voltage unbalance
- General BMS operation alarms
Check whether these errors are present in the screen located on the robot's chest.
The normal operation of the Battery Pack is that, in the absence of the above alarms, it is ready to supply current with the power contacts closed.
Warning
Pay absolute attention to the power contacts: the Battery Pack exposes the contacts so that they can be inserted into the robot.
Any violation or improper use can cause serious injury to those involved and severely damage the hardware.
If there are alarms, contact the persons in charge.
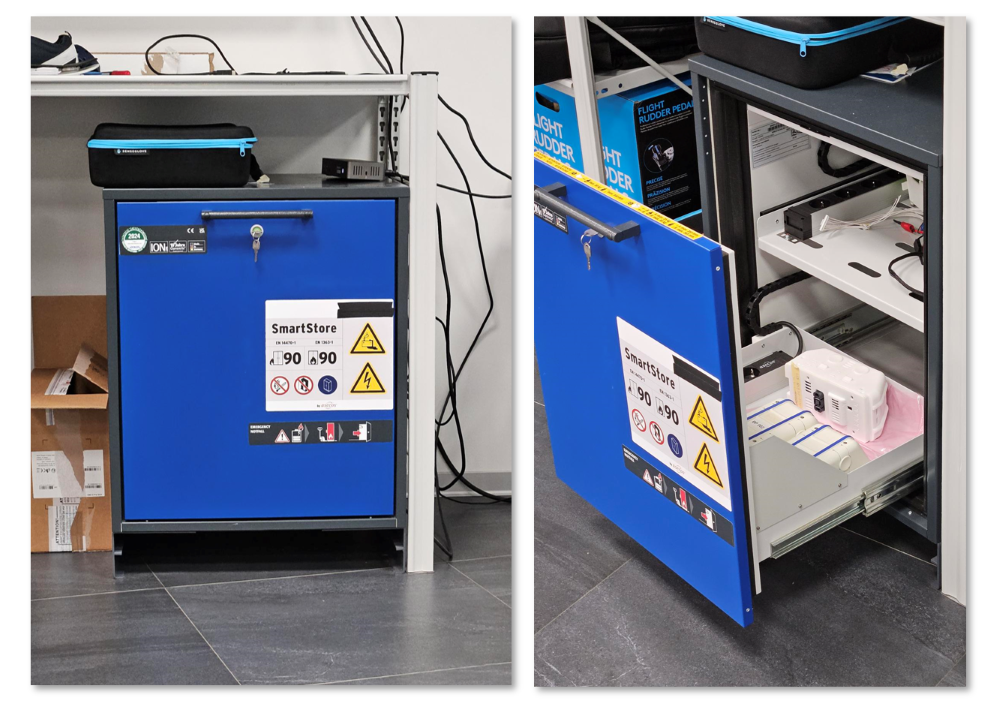
Storing the battery pack
The Battery Pack must always be stored in the battery container when not in use for safety reasons. Do not leave the battery pack elsewhere or on the robot.
Stowe it in robot arena in the cabinet shown in this image:
Note
The Battery pack, with no connections, is to be considered as switched off (sleep mode) but ready to supply power when plugged into the robot.
Charging the battery pack
The Battery pack must be charged with the appropriate charger. Follow the instructions given here for the charging procedure.
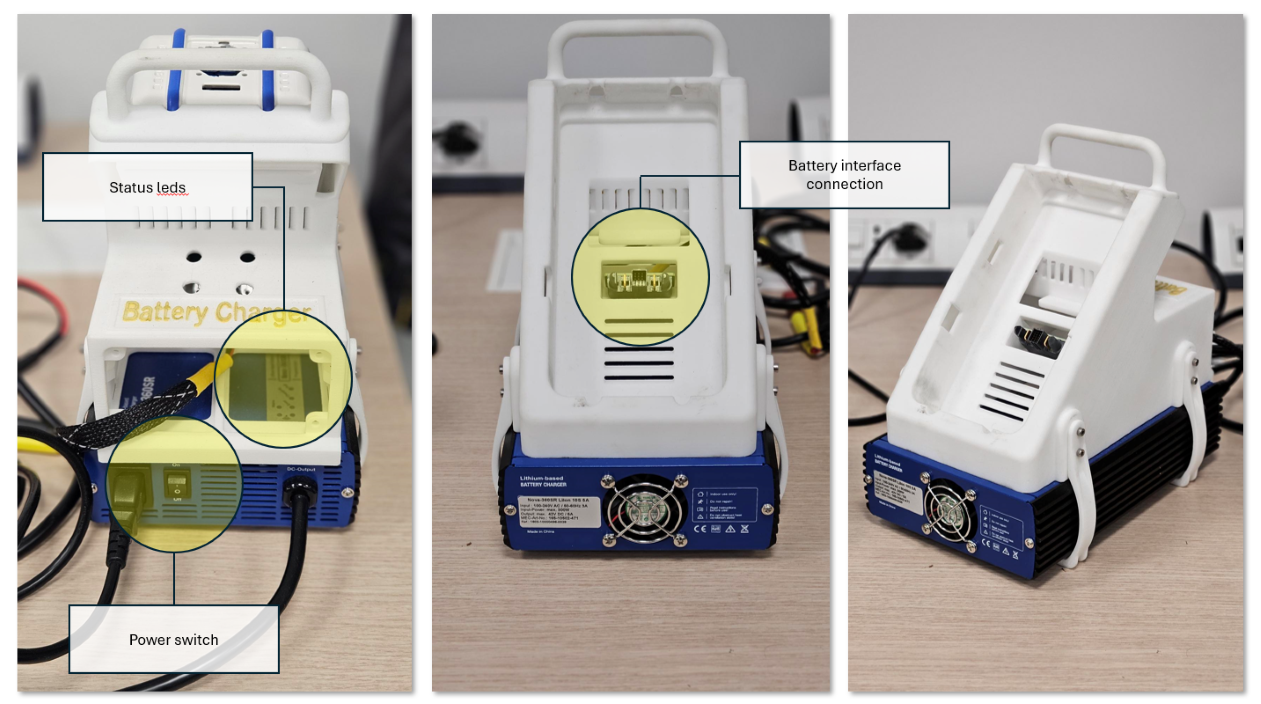
To proceed correctly, follow these steps:
- Insert the
Battery packinto the appropriate slot in the charging station. - Now switch on the charger, so that if necessary the charging phase will start directly.
After that, the charger will perform a few tests and start charging. You can figure out that the system is working properly when the ‘charging’ status LED is lit. When charging is complete, the charger will finish charging. This step corresponds to the ‘full’ status.
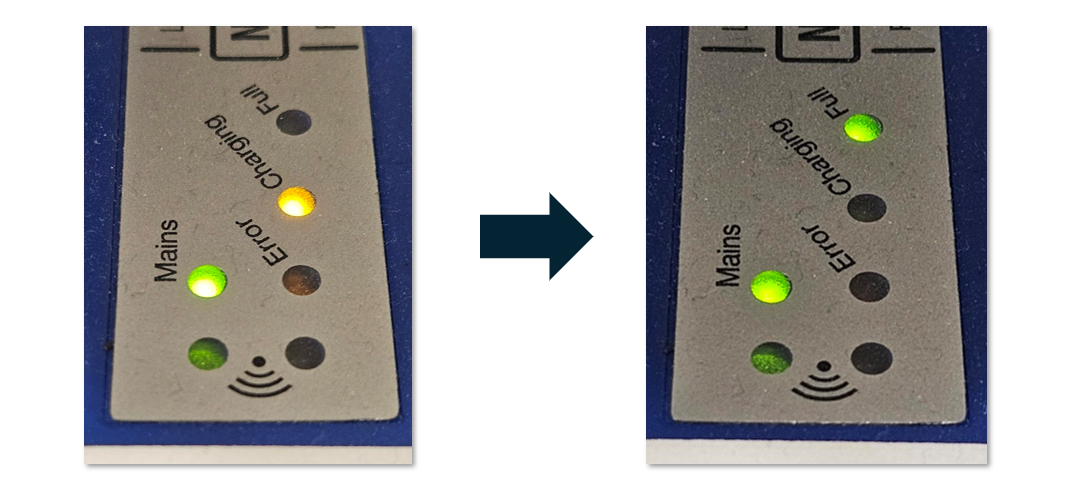
If this step or anything else did not work properly, you will get the ‘error’ LED. In this case make sure that the Battery pack and charger
are working. If the error persists, report it to the responsible person and put the Battery pack back in the cabinet.
If the charging process is successful, you can use the battery pack on the robot. Follow the next section for this part.
Using the battery pack on the robot
the Battery pack is designed for agile use on the robot. The idea was to create a plug-and-play system. In the correct condition of use, the battery will be inserted on the back of the ergocub in the dedicated compartment and, similar to using an external power supply, the robot is ready to use. Conditions other than this scenario may refer to failures or special situations. Read this chapter to learn more.
Robot switched off, without external power supply
Consider this scenario when the robot is switched off and there are no power cables connected to the robot. In this scenario, you only want to switch the robot on by inserting the Battery pack.
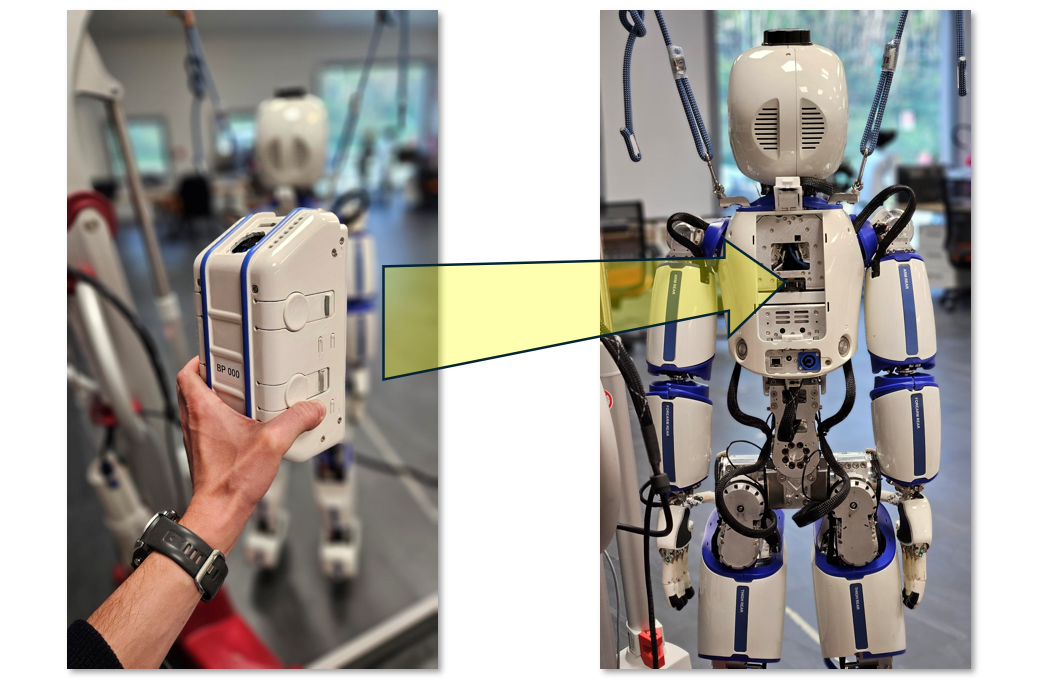
The robot is switched off, if you insert the Battery pack into the slot shown in the figure, you will automatically power the robot. Consider this case as equivalent to the situation where you do not have the Battery pack and want to use the robot with the external power cable.
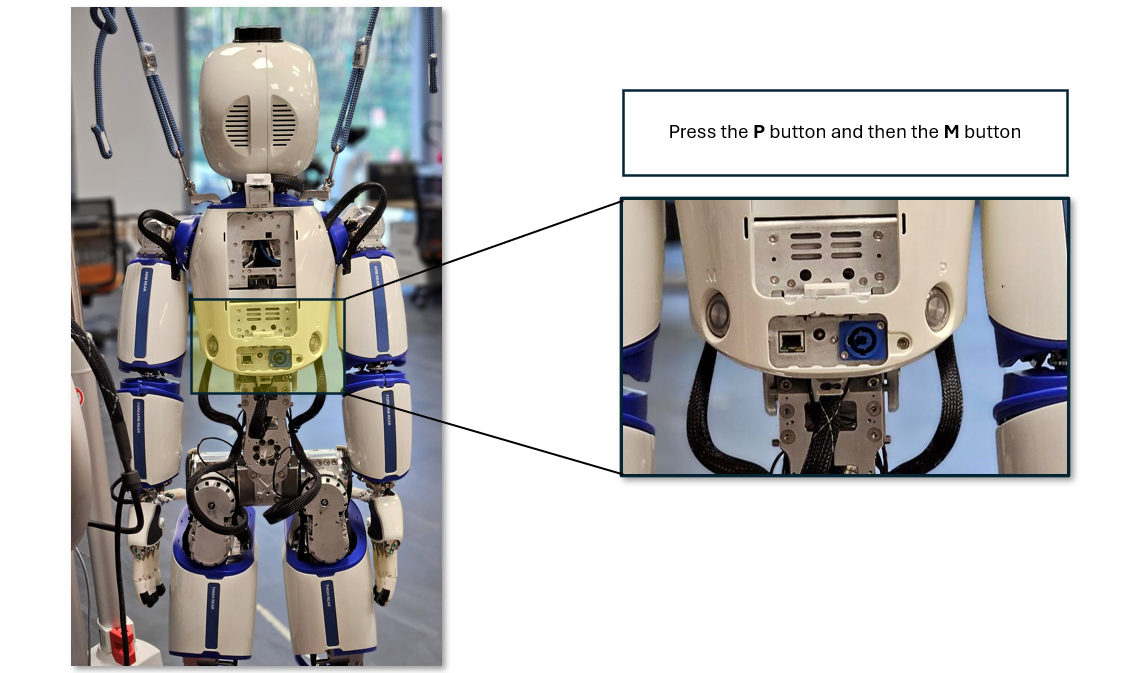
At this point the Battery pack verifies (via the integrated BMS) that the use case is compliant. If this step did not detect any anomalies, switch the robot on using the buttons shown in the figure.
If everything worked properly, the robot will be ready to use and you can see the battery percentage on the front display.
Cases other than this could result in battery failure or anomaly. Disconnect the Battery pack from the robot and check that it is charged. Then take the Battery pack to the persons in charge to check that everything is OK.
Robot switched on, with external power supply
In this situation you have the robot switched on and working properly. The power source is external via the blue power cable. If you wish to switch to battery power you have two options:
1. Switch the robot off, disconnect the Blue cable. In this case, you are in the situation described above.
2. You want to make a ‘hot swap’ without interrupting the robot's functionality. In this case, follow the steps listed here:
Note
Pay attention to these steps, you might suddenly switch off the robot and damage it.
- Insert the
Battery packwith the robot powered through the external power cable. - Check from the display on the front that the
Battery packis charged and free of allarms. - Switch off the external power supply and disconnect the blue external power cable from the robot.
If these steps are successful, you will have achieved a hot swap without service interruption.
If this step did not work, make sure the Battery pack is charged and error-free. Check with the person in charge that no faults are present.
Robot switched on, powered by battery pack
In this situation, the robot is correctly functioning and powered by the Battery pack. If you wish to change power supply you still have two possible scenarios:
1. Switch the robot off, disconnect the Battery pack. in this case you are in the first situation described if you want to restart with a new charged Battery pack. If, on the other hand, you want to power the robot via the external power supply, connect the Blue cable, switch on the power supply, and switch the robot on again by pressing P and then M buttons.
2. If you do not want to interrupt the robot's functionality, you can perform a ‘hot swap’. You again have two options, continue with an external power supply or use a new Battery pack. Follow the steps for this procedure:
Note
Pay attention to these steps, you might suddenly switch off the robot and damage it.
- The robot is functional and receives power from the
Battery packto be replaced. Prepare the external power supply, connect the blue connector to the robot's power port. - Activate the power supply so that it can supply power to the robot.
- Disconnect/remove the
Battery pack, the robot will automatically remain switched on via the external power supply.
If you now want to switch back to a power supply via a new battery pack, follow the steps described in the previous chapter.
If this steps doesn't work, make sure the Battery pack is charged and error-free. Check with the person in charge that no faults are present.